Hands on the wireless sensor nodes – Zephyr
Like described in the last part, we use a zephyr based application which checks for updates on the board. Today, we start flashing a simple „hello world“ zephyr application as preparation for the MCUboot installation next time. Most of the instructions are already described on the „Getting Started“ page of zephyr, but at some points additional information is given.
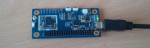
We use a 96B Nitrogen as the target board in this example. If you use another board, details might be different (like board names of course, but also the flash tool).
Prerequisites
Necessary Packages
Like described here, let us install some packages to build zephyr.
fota@demo:~$ sudo apt-get install --no-install-recommends git ninja-build gperf ccache dfu-util device-tree-compiler wget python3-pip python3-setuptools python3-wheel xz-utils file make gcc gcc-multilib virtualenv
We will need to update some additional python packages. We use a virtualenv so we don’t install everything globally. You can also install everything.
fota@demo:~$ virtualenv -p python3 ~/virtualenvs/fota # this creates a new python3 virtual env
fota@demo:~$ source ~/virtualenvs/fota/bin/activate # this activates the virtualenv. Do this always when you open a new terminal so the installed python packages are available!
(fota) fota@demo:~$ # virtualenv 'fota' is active. For convenience, we drop the virtualenv notation. Just always have it activated when you do something for this blog!
Additionally, a pretty up-to-date version of cmake (version 3.13) is needed. The easiest way to get one is to install it with pip3:
fota@demo:~$ pip3 install cmake
Then, install pyocd. This is a useful tool which flashes software over the Debug Access Port (DAP). If your board does not support flashing over DAP, install your flash software instead. You can find additional informations on the zephyr board support page.
fota@demo:~$ pip3 install pyocd
Note pyocd: With pyocd, a direct communication with the board is possible. Unfortunately, the 96B Nitrogen is being detected incorrectly as an nrf51 (in pyOCD). Call pyocd with -t nrf52 if needed, otherwise memory access might fail. I use version 0.19.0 for this tutorial, but newer versions should also work.
TTY access
Install minicom to see what happens on the board.
fota@demo:~$ sudo apt install minicom
To connect to the board via serial console without using sudo, add the current user (my user is named fota) to the dialout group.
fota@demo:~$ sudo adduser fota dialout # my user is called fota
To be able to access the board as a nonprivileged user, add the following line into a file 50-cmsis-dap.rules in /etc/udev/rules.d/:
# This are the attributes for the 96B Nitrogen
# Execute 'lsusb' to find out parameters for your board (output is 0d28:0204 for my board)
ATTR{idProduct}=="0204", ATTR{idVendor}=="0d28", MODE="0666", GROUP="plugdev"
After a relogin and restart, you can plug in the board. Check if the board is detected and can be accessed (don’t forget to activate the virtualenv again!):
fota@demo:~$ pyocd list
## => Board Name | Unique ID
-- -- ----------------------
 0 => Arch BLE [nrf51] | 9009022103BB3A5BFE6555AA
As the last step before installing zephyr, let us connect to the serial output of the board with the following command. This is useful for debugging and development because we see what is happening.
# -b is the baud-rate, a board type specific value.
# -D is the device tty, the number can differ.
fota@demo:~$ minicom -b 115200 -D /dev/ttyACM0 # Exit with Ctrl+a x
Welcome to minicom 2.7.1
[...]
Keep this terminal window open for this part, expected output will be given in this article if something happens on the board!
Zephyr
Zephyr is an open-source real-time operating system for embedded devices released under the Apache License 2.0. It is the foundation to run our own applications on board.
![]()
Installation
Let us start with downloading the zephyr code and install all needed dependencies.
For this, we first install west, a meta-tool developed by zephyrproject to install, build and flash the operating system:
fota@demo:~$ pip3 install west # I used version 0.5.7
After that, we can clone the code from GitHub and install all needed requirements:
fota@demo:~$ west init zephyrproject --mr v1.14.0
fota@demo:~$ cd zephyrproject
fota@demo:~/zephyrproject$ west update
fota@demo:~/zephyrproject$ pip3 install -r zephyr/scripts/requirements.txt
Additionally, cross-compilers are needed to build for our board. Fortunately, Zephyr Project offers an SDK which contains all needed compilers and linkers. We can install it with the following commands, you can find the newest version here:
# 0.10.0 was the most recent version available
fota@demo:~/zephyrproject$ wget https://github.com/zephyrproject-rtos/sdk-ng/releases/download/v0.10.0/zephyr-sdk-0.10.0-setup.run
fota@demo:~/zephyrproject$ sh zephyr-sdk-0.10.0-setup.run
When asked for an installation path, we chose /home/fota/zephyrproject/zephyr-sdk. The exact path is not important, but remember it for the next step.
Last but not least, we have to specify variables to let the build system know where to find the zephyr SDK and all compilers. Add the following lines with your paths into your .bashrc:
export ZEPHYR_BASE=~/zephyrproject/zephyr  # modify to your path
export ZEPHYR_TOOLCHAIN_VARIANT=zephyr
export ZEPHYR_SDK_INSTALL_DIR=~/zephyrproject/zephyr-sdk # modify to your path
After that, restart your shell. Now, we are ready to build our first application for the board.
Building and flashing an application
Okay, enough installed. Create a folder to build our first application:
fota@demo:~/zephyrproject$ mkdir builds && cd builds/
Let us build the hello world example which is included in the zephyr code base by using west:
# west build builds an application
# -s specifies the source path
# -b specifies the board, see here for your board name
# -d specifies the target build path
fota@demo:~/zephyrproject/builds$ west build -s ../zephyr/samples/hello_world -b 96b_nitrogen -d build-hello_world
After that, the build images are in build-hello_world/zephyr/zephyr.{bin,hex,...}. In zephyr, you compile the application together with the operating system into one single binary. Exchanging the application without exhanging the operating system is not supported, but we will avoid this problem later.
We can now flash our application. west will automatically search for the file in the given directory:
# west flash flashes the given application
# -d specifies the build path where our result is
fota@demo:~/zephyrproject/builds$ west flash -d build-hello_world
ninja: no work to do.
Using runner: pyocd
Flashing Target Device
0000772:INFO:rom_table:AP#0 ROM table #0 @ 0xe00ff000 (designer=244 part=006)
0000792:INFO:rom_table:[0]
0000810:INFO:rom_table:[1]
0000823:INFO:rom_table:[2]
0000837:INFO:rom_table:[3]
0000852:INFO:rom_table:[4]
0000866:INFO:rom_table:[5]
[====================] 100%
0004122:INFO:loader:Erased 0 bytes (0 sectors), programmed 0 bytes (0 pages), skipped 16384 bytes (4 pages) at 5.11 kB/s
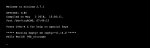
If everything went well so far, you will see an output similar to this one in your minicom-Terminal:
***** Booting Zephyr OS zephyr-v1.14.0 *****
Hello World! 96b_nitrogen
Congratulation, you just successfully built and flashed your first zephyr application!
In the next part, MCUboot, a secure open source bootloader, is installed and the first firmware upgrade (over cable, but at least secure!) will be performed.
- A Setup for Firmware Updates over the Air – Part 4 (Gateway) - 11. Februar 2020
- A Setup for Firmware Updates over the Air – Part 3 (Wireless Sensor Nodes: MCUboot) - 17. Oktober 2019
- A Setup for Firmware Updates over the Air – Part 2 (Wireless Sensor Nodes: Zephyr) - 7. August 2019