
Why do we need firmware updates over the air?
You know that every software contains bugs. Especially in IoT with billions of devices (many more than normal computers), a single error affects a big number of users. On PCs or mobile phones, you could easily update the software with your package manager. Unfortunately, in IoT and embedded software, it’s often impossible to have hardware access to the devices.
Therefore, „firmware updates over the air“ (FOTA) are needed so devices can upgrade themselves. Of course, the update process itself has to be secure so no one can flash malicious software to take over the devices easily.
This is the first article of a blog series in which I want to present a basic setup for firmware over the air updates. Today, I want to outline the general architecture for the software on the wireless node, a secure bootloader based on zephyr. The next article is a hands on to flash this software on the board and run an update via command lines. A follow-up article will extend this to running updates via a cloud-based backend.
MCUboot as the main bootloader
To make updates possible, it is common to separate the loading of the application from the main application with a so-called bootloader. So, the bootloader doesn’t have to be replaced on update and can verify the new application image.
I choose MCUboot as the basic bootloader for our devices. MCUboot is an open source bootloader which enables secure software upgrades and starts the application. Only basic mechanisms and features of MCUboot are described here, see the design documents for a detailed description.
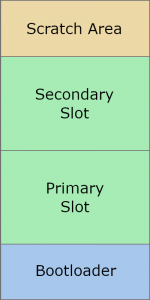
MCUboot separates the flash memory into four parts:
- Bootloader: Place where the bootloader code is stored
- Primary Slot: Partition with the currently active application image
- Secondary Slot: Partition where new images are stored before updating
- Scratch area: Partition to store parts of images, needed for swapping
The MCUboot bootloader starts immediately after powering up. Normally, MCUboot boots the image of the Primary Slot. But the case when an updated image is deployed is more interesting.
Security features for firmware updates
To upgrade a new firmware, first the new binary has to be loaded into the Secondary Slot. Later, this will be accomplished by our demo application. After a reboot, MCUboot will detect if a new firmware image exists and then do the following:
- Basic integrity check: The image starts with the correct magic values, the calculated SHA256 sum corresponds to the SHA256 sum given in the image, and more.
- If the image is signed, check that the signature matches one of the internal public keys which were flashed together with MCUboot.
- Swap the two images by using the Scratch area. A swap is used because the old image might still be needed again in case of failure. Applications are compiled position dependent, so booting from the Secondary Slot is not possible.
- The new image, which is now stored in the Primary Slot, is booted.
- After the start, the application can perform optional self-tests. After that, it has to mark the new image as ‚OK‘ so it is loaded again after the next restart. If this flag is missing, the images will be swapped back at the next start to prevent bricking the device.
The signature check feature of MCUboot is the fundamental element to ensure that only our own images will run.
Demo applications
After the bootloading phase, the normal business application runs on the board. This could be anything you want (e.g. monitoring and sending temperature data). Separated from the core logic, a part of the application is responsible for the upgrade process. The exact behaviour depends on the update frontend (for demo purposes a CLI may suffice, for real products a cloud-based approach is required), but the basic procedure is the following:
The FOTA logic runs as a background thread and looks for updates. If a new update is available, it will be downloaded into the Secondary Slot (like described above). After that, the board will reset itself and MCUboot loads the new image.
Enough theory. In the next blog post, we flash a „96Boards Nitrogen“ board and build our demo app with zephyr. After that, we’ll set up the gateway and configure a frontend.
- A Setup for Firmware Updates over the Air – Part 4 (Gateway) - 11. Februar 2020
- A Setup for Firmware Updates over the Air – Part 3 (Wireless Sensor Nodes: MCUboot) - 17. Oktober 2019
- A Setup for Firmware Updates over the Air – Part 2 (Wireless Sensor Nodes: Zephyr) - 7. August 2019