
If you’re developing a web application in a team, you might have wondered sometimes: With all the automation involved in my CI setup, why do I still need to pull other people’s branches and run it locally to see a proposed change in action? Even if you got your Git workflow in muscle-memory and have containerized everything to get rid of “works on my machine” scenarios, it still often feels cumbersome and a waste of time.
So why not let your CI pipeline do it for you? After all, for most code reviews, all you want to do is look at the code and see first-hand if it works. No need for interrupting whatever you’ve been doing in your local repository.
In this post, we will explore how to channel your inner MacGuyver with a GitLab project, a Linux VM, and a bit of shell scripting to get a single-node Kubernetes cluster to manage your review deployments. You should be this tall to ride, but rest assured that there is no need for any prior experience with Kubernetes.
Here are the ingredients for our setup:
- Minikube: A tool to run a single-node Kubernetes cluster on your local machine
- Some machine to run Minikube on: We are going to use a Debian 10 VM here
- A wildcard DNS entry pointing to your VM: For this example, let’s say it is
*.myapp.example.com
(If you don’t have this readily available, you can fall back to a service like nip.io or xip.io)
Within this walkthrough, we will be using a self-hosted GitLab instance (version 12.4.1) and its integrated CI, taking advantage of the integration with Kubernetes to handle credentials and make kubectl available within the build environment. That said, it should be fairly easy to adopt this example to any other platform by passing the authentication secrets manually.
Setting up Minikube
First, we are going to install Minikube and kubectl on our Debian VM. For other distros, see the official docs here and here. On Debian 10, this is how we do it:
sudo apt install docker.io- Download and install the latest .deb package from the official GitHub repo
- Download the latest stable, standalone binary of kubectl:
curl -LO https://storage.googleapis.com/kubernetes-release/release/`curl -s https://storage.googleapis.com/kubernetes-release/release/stable.txt`/bin/linux/amd64/kubectl
and put it in your
$PATH. For a more sustainable installation method, there is also an official APT repository available.
In the next step, we set up and launch our first Minikube cluster like this:
sudo minikube start --addons=ingress --driver=none
By choosing the none driver, the cluster operates without effective isolation between nodes, so some care is advised. It should only be done like this within a throwaway VM like ours, and you should have some trust in the deployed app. On the flip side, the advantage of this driver is that it attaches directly to the physical network instead of opening a private internal network. This allows us to easily interact with Minikube from the outside, without having to set up additional port forwarding. With that in mind, feel free to select a different driver that works better for you.
Integration with GitLab
Now that our own little Kubernetes cluster is ready to go, we need to give GitLab control over it. Thanks to GitLab’s integrated support for this, we do not need to manually pass the necessary credentials to our CI environment. To set this up, we go to Operations→Kubernetes in our repository and select “Add Kubernetes cluster” and then “Add existing cluster”. The setup wizard will reference a very helpful documentation article that walks you through a little dance of copying & pasting that is needed to fill out the form and provide all the credentials. Just a few additional hints:
- You’ll be prompted to run kubectl commands, and you might need to use sudo for that
- Keep the checkbox for “GitLab-managed cluster” unchecked (no need for this)
- After adding the cluster, don’t forget to enter your subdomain (our myapp.example.com) as the cluster base domain
Now we have full control over our Minikube from within CI jobs.
Deploying from the CI pipeline
As the final building block for our setup, we need to figure out how to tell the cluster to make a deployment, and maybe even more importantly, how to remove it once it is not needed anymore. For this tracking of active deployments, GitLab offers the concept of environments. An environment has a name and a URL, and it can be created from within a CI job. This environment is kept alive for as long as the job’s underlying branch is not deleted. We can then create a second CI job that is not executed when the pipeline runs but is deferred to when the environment is removed.
This means that GitLab does not know the details of our deployment (only its URL), but it will trigger our code when it is time to wipe the deployment from our cluster.
If you like, you can also give deployments an expiration date regardless of how long the branch lives by using the auto-stop feature.
All this is done with the following chunk of YAML for your .gitlab-ci.yml:
# Common base for jobs that deploy to k8s
.deploy-base:
  # For deploying, we need an image that can interact with k8s. Using
  # GitLab's own official image for this should be safe enough:
  image: registry.gitlab.com/gitlab-org/cluster-integration/helm-install-image/releases/2.16.6-kube-1.13.12
  variables:
    # Define k8s namespace and domain used for deployment:
    NS: $CI_COMMIT_REF_SLUG
    CI_ENVIRONMENT_DOMAIN: $CI_COMMIT_REF_SLUG.$KUBE_INGRESS_BASE_DOMAIN
  only:
    # Deploy only branches and tags:
    refs:
      - branches
      - tags
    # Deploy only if k8s integration is configured:
    kubernetes: active


# Job that deploys the app to k8s:
deploy:branch:
  stage: deploy
  extends: .deploy-base
  environment:
    name: $CI_COMMIT_REF_SLUG
    url: http://$CI_COMMIT_REF_SLUG.$KUBE_INGRESS_BASE_DOMAIN
    on_stop: deploy:stop_branch
  before_script:
    - apk add gettext
  script:
    # Create dedicated namespace to deploy in (delete first, if it already exists):
    - kubectl get namespace $NS && kubectl delete namespace $NS || true
    - kubectl create namespace $NS

    # Make Docker credentials available for deployment:
    - kubectl -n $NS create secret docker-registry gitlab-registry --docker-server="$CI_REGISTRY" --docker-username="$CI_REGISTRY_USER" --docker-password="$CI_REGISTRY_PASSWORD"
    - kubectl -n $NS patch serviceaccount default -p '{"imagePullSecrets":[{"name":"gitlab-registry"}]}'

    # Start and expose deployment, set up ingress:
    - kubectl -n $NS create deployment myapp --image=$CI_REGISTRY_IMAGE/$CI_COMMIT_REF_SLUG
    - kubectl -n $NS expose deployment/myapp --type=NodePort --port 3000

    # Set up ingress with env var expansion from template:
    - envsubst < k8s/ingress.yml.tpl | kubectl -n $NS apply -f -

    # Wait for pod
    - kubectl -n $NS wait --for=condition=available deployment/myapp --timeout=180s


# Job that destroys the k8s namespace used to deploy the app. This gets
# triggered either manually or when the environment is stopped (e.g., when an
# MR is merged):
deploy:stop_branch:
  stage: deploy
  extends: .deploy-base
  when: manual
  # This job must not have any dependencies, otherwise it will refuse to run
  # when the artifact retention of previous jobs has expired:
  dependencies: []
  environment:
    name: $CI_COMMIT_REF_SLUG
    action: stop
  variables:
    # Disable checkout here because the ref might not be available anymore
    GIT_STRATEGY: none
  script:
    - kubectl delete namespace $NS
This makes some assumptions about your existing CI pipeline, so you might need to adjust it a bit:
- You have packaged your app in a Docker container
- The container listens on port 3000
- You have pushed it into GitLab’s container registry under the name
$CI_REGISTRY_IMAGE/$CI_COMMIT_REF_SLUG
Corresponding to the container name, we use $CI_COMMIT_REF_SLUG to determine the subdomain as well. This means that any subsequent updates to the branch (and thus new runs of the pipeline) will replace a previous deployment. This choice is a trade-off between granularity and resource consumption. In case it fits your needs better, you can also go with $CI_COMMIT_SHORT_SHA. This will effectively make each deployment immutable, as they can never be replaced with something else.
Unfortunately, kubectl doesn’t let us create a simple ingress in a one-liner, that’s why you can see a reference to a separate file at k8s/ingress.yml.tpl, which contains the ingress spec:
apiVersion: networking.k8s.io/v1beta1
kind: Ingress
metadata:
  name: ingress
spec:
  rules:
    - host: $CI_ENVIRONMENT_DOMAIN
      http:
        paths:
          - path: /
            backend:
              serviceName: myapp
              servicePort: 3000
And finally, this is it! Once you add this to your repository and open the merge request, you will see that GitLab kindly places a direct link to the URL associated with the environment along with the pipeline status:
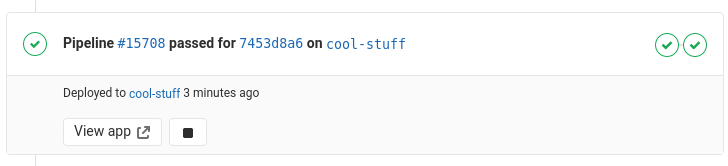
That link will bring you to http://cool-stuff.myapp.example.com/ pointing to your cluster ingress, which routes you to the just-launched pod at port 3000, where your application is running. Everything is tied to a namespace dedicated to this deployment, so tearing down the deployment is as simple as deleting the namespace.
You can download the full .gitlab-ci.yml that we used in our sample repository here.

- How to speed up clang-tidy with unity builds - 3. November 2020
- How to automate review deployments with Kubernetes and GitLab - 16. Juli 2020
- Security für Software Engineers - 13. Juni 2018
Ähnliche Artikel
 3. August 2023 Antora and AsciiDoc for Better Documentation
 3. November 2020 How to speed up clang-tidy with unity builds
 29. Juni 2017 Introduction to the Yocto build system