
Zephyr is an open-source Real-Time Operating System (RTOS) developed under the umbrella of the Linux foundation since 2016. If you are an embedded software developer, you probably worked with a few different RTOSes already. So why should you care about another one? In this blog post, I want to answer this question.
In short, the answer is: Because Zephyr is not just an ordinary RTOS kernel — it is much more than that.
When you download Zephyr, you get a kernel as well as lots of libraries on top, including a full TCP/IP and Bluetooth stack! If you are looking for an RTOS for your next IoT project, that fact alone should put Zephyr on the map for you.
Zephyr has even more to offer though. I could fill the remainder of the article by enumerating all the cool features that Zephyr provides. That would be rather boring, however, and you wouldn’t get any information you could not look up quickly on its quite beginner-friendly documentation. Therefore, I want to highlight those features, which make life easier for us as developers.
The build system: Configure, build and flash with 1 command
When you get started with a new framework, which tasks eat up most of your time? Often, these are organizing dependencies, figuring out the correct configuration, and stumbling over initial set-up issues. Zephyr has already taken care of these annoying tasks for you. It provides an SDK which packages all tools needed to develop for all supported architectures.
Additionally, it provides a dedicated tool, called West, for performing all tasks related to compiling, flashing, debugging, utilizing open-source and field-proven technologies like Git, CMake, and KConfig. With this, you can flash an application to a board with a single command, as west will automatically figure out the setting, toolchain, and programming adapter to use for you. Since it uses CMake, anyone familiar with it can easily set up their own project.
west build -b nucleo_f767zi -t flash ../zephyr/samples/basic/blinkyAll you need to configure, compile, and flash the blinky sample for an STM Nucleo board.
The configuration system: Gives you modularity without macro hell
A challenge in software development is that program components often become so interwoven that you cannot separate them anymore. This makes maintaining and interchanging components very painful.
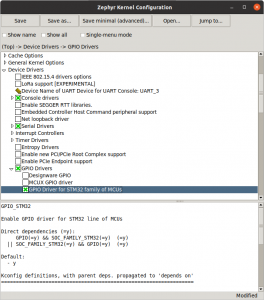
To combat this, the Zephyr source is rigorously divided into small modules. The Kconfig system developed for the Linux kernel is utilized to declare these modules and their dependencies together with any related compile-time configuration values.
With this system, you can enable only the modules your application needs. All other modules are not compiled in. This also keeps the binary size minimal, which is usually a concern in embedded development.
The hardware description: Make your software hardware-independent
Another system Zephyr adapted from the Linux kernel is the device-tree. It is used to describe the components of a particular hardware target. It does not only describe which ones are present, but also what type they have, which driver they need, and how they are connected.
You might wonder why the type of a component is relevant. This is because Zephyr offers abstract APIs for many common hardware components and buses, such as GPIOs, SPI, ADC and PWM. You can interact with these components through the abstract API and Zephyr then talks with the driver specified in the device-tree.
All you need to do is fetching a handle to a component by its name and use the abstract API. For common component types, configuration values can also be specified in the device-tree as well, such as whether a GPIO pin is active low or high. If you use a stock board, you likely won’t even have to worry about setting up the device-tree because many manufacturers already provide device-tree bindings for their board within Zephyr.
When you write your drivers and applications to utilize this hardware description and abstraction, they will work with any board providing the needed components, regardless of their wiring and configuration. With that, you can get rid of a major source of difficult-to-track errors.
// fetch the handle to the GPIO_1 by names
constexpr device const* gpio_1 = DEVICE_DT_GET(DT_NODELABEL(GPIO_1));

// configure pin 10 to be output with active-high configuration
gpio_pin_configure(gpio_1, 10, GPIO_OUTPUT_INACTIVE | GPIO_ACTIVE_HIGH);

// set pin 10 to active
gpio_pin_set(gpio_1, 10, value);
All you need to enable an LED connected to pin 10 of GPIO 1.
Are you not yet convinced to give Zephyr a try? Then wait for the follow-up! One blog post is just not enough to highlight the most useful features. To give a balanced view, I will also use it to write about reasons that could speak against using Zephyr, despite its benefits.
- What can the Zephyr RTOS do for you as a developer? (Part 2) - 16. Dezember 2021
- What can the Zephyr RTOS do for you as a developer? (Part 1) - 14. Dezember 2021
Ähnliche Artikel
 16. Dezember 2021 What can the Zephyr RTOS do for you as a developer? (Part 2)
 29. Juni 2017 Introduction to the Yocto build system
- 22. September 2022 Measuring Real-Time Operating System Performance – Part II: Comparing FreeRTOS vs. Zephyr